Kombucha 101

Kombucha is something I have been wanting to try as it is reported to be healthy for you and such. I got a chance to attend a class one evening on how it is done, and got a lovely little Kombucha Mother to start my own brewing bonanza.

DSC_0033 (2)
New batch and flavor added batch ready to bottle

It is really a super simple thing to do, once you have the ingredients; organic cane sugar, organic black tea, chlorine free water (we are on a well so are good to go) , a Kombucha mother in 2 cups of brew and a one gallon jar. Everything can be found at your local bulk store or grocer except the mother in her mix. You will need a source for that so check out your local farm market, one of your crazy hippy-dippy friends, that homesteading Aunt of your friend from work you are always hearing about…someone has one, you just need to find them. I got mine from the people giving the class, a lovely couple with an organic farm nearby (Heart Beet Organics).

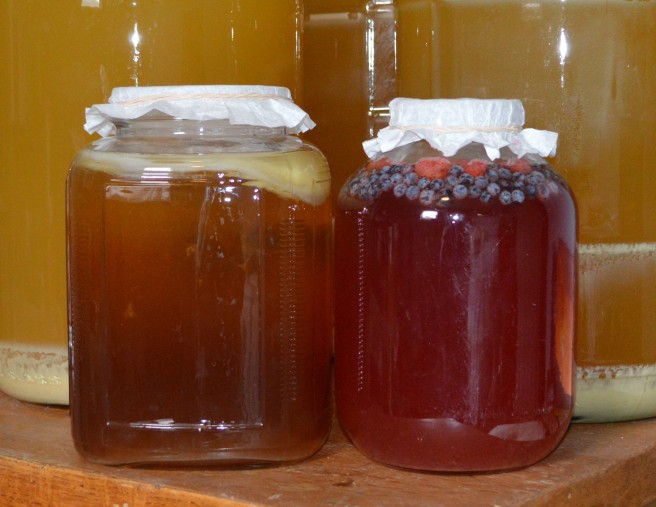
The magic is created starting with 2 cups of boiling water, place 4-6 tea bags to steep for 10 minutes then remove the bags and add 1 cup cane sugar, stirring to dissolve. Add the super sweet tea to the gallon jar, fill half way with cool water and add the mother and 2 cups of the last brew of Kombucha. Fill the gallon jar to within an inch or two from the top, cover with a cloth (coffee filter works fine) and secure with an elastic to keep out fruit flies and your cat (you just never know with cats).

In 7-21 days you have Kombucha. Be mindful that the longer you ferment the more sweetness you lose. Stop it when you like the taste. Mine went 14 days to get to where I like it, not too sour and not too sweet but just right for mamma bear.

Adding flavor is next. Remove the mother and 2 cups of brew for your next batch. Strain the Kombucha into another container and add your fruit or herbs. Let sit for 24-48 hours then strain out the additives and then bottle for another day or two. This creates more carbonation. At this point refrigerate and enjoy!

Note on the bottle to use, it must be a  bottle that can withstand the build up of pressure, a Grolsch beer bottle works great. A mason jar will not produce the carbonation you may be looking for. Fill the bottle to an inch of the top, cap and place in the fridge to slow further fermenting. Take care when opening, it will fizz over so have a glass handy or a sink or your mouth, whatever.

You can feed your Scoby with sweet tea and keep until later if you are not wanting a new batch yet. If you have multiple Scoby growths/babies you can make a Scoby hotel. Sounds cute but it is just a holding space to keep the Scoby alive until you need them. As this is my second batch I am not there yet.

Fermenting is addictive. It all started with a “couple” of wine kits, progressed to raw honey mead (awesomeness in a bottle), honey fermented garlic, sauerkraut and now Kombucha. I am very interested in finding a Jun mother Scoby, a ferment made with raw honey and green tea, to add to the collection of healthy, yummy, fun to make treats.

Go forth and ferment, my fellow enthusiasts!


Wax Fabric Wraps

Well, today is a sick day. Just enough under the weather to not be able to process numbers at work and after sleeping a full 12 hours, lazing around for the better part of the day I have just enough energy to attempt a long awaited project. Wax and pine resin fabric food wraps.

I have been intrigued for some time but just got the pine resin powder in this week. I think this looks fairly simple, even if a bit groggy.  Here goes the first attempt!

I got the instructions from Mommypotamus. I loved it when I saw it.

I used her ratio for different sized sheets of fabric but used coconut oil instead of Jojoba. No special reason other than it is what I had in my home making soap/balms arsenal. It seems to have worked just fine:

8×8 Sheet
2 teaspoons grated, packed beeswax
2 teaspoons powdered pine resin
1/2 teaspoon jojoba oil
11×11 Sheet
1 tablespoon plus 1 teaspoon grated, packed beeswax
1 tablespoon plus 1 teaspoon powdered pine resin
1 teaspoon jojoba oil
14×14 Sheet
1 tablespoon plus 2.5 teaspoons grated, packed beeswax
1 tablespoon plus 2.5 teaspoons powdered pine resin
2.5 teaspoons jojoba oil

I made a 9×9 sheet and used the same ratio as the 8×8, still worked. I mixed the ingredients per sheet in a saucer, mashed them with my fingers and sprinkled them on each sheet.

DSC_0001 (2)

As for lumping on the fabric when heated, just heat it more. The pine resin takes longer than the wax to liquefy. Have some patience, for all of 10 minutes, OK?  Used a wide craft brush to even the  melted oils over the fabric, holding one edge in place with a wooden skewer as they want to stick to the brush.

DSC_0007 (2)DSC_0011 (2)

I then hung the fabric over a make shift clothes line. I happen to have an antique indoor retractable clothes line. You just never know when these things will come in handy! I love old stuff. Some string and a couple of nails works too.

These dried by the time the next batch was out of the oven. They are tacky, as they should be, and my house smells like a bad car freshener, but it’s all good considering the nifty little things that they are.  (The plant on the window sill is turmeric. Whether it ever produces anything or not, it is a nice house plant.)

DSC_0020 (2)

They cling well but leave a film on my hands at the moment. If that doesn’t go away I will reheat them and add another piece of fabric on top and press out the excess oils into the next batch. It’s enough for today.***ended up reheating with double fabric to absorb the excess, ended up with twice the wraps, very neat.

If we had to keep all of our waste in our own back yard, we would do better at reusing and recycling (or you could just bury it like our grandfathers did… I am still digging up surprises in the garden yearly. Archaeological dig anyone?!).

Anyway, one more way to eliminate waste and a fun afternoon.


Fresh Beginnings

As with every new year we settle down and rethink our plans for the upcoming year on the homestead. What can we expand, what should be dropped, what new projects can we take on?

This year sees us re-certifying our kitchen to allow us to go back full force to canning and making our much loved chicken pot pie and rhubarb rosemary BBQ sauce. We have applied to be part of a local craft fair in November 2018 so plans for that are under way. The raising of chickens is being expanded as are the bees. We have been experimenting with the brewing of honey mead and have come up with a very nice fruit flavored mead we hope to continue and expand on.

Our newest and most exciting project this year is creating a Saturday morning farmers market here on the homestead. We have our seeds ordered for early vegetables and are also doing an early batch of chickens. They should be ready just in time for the first market weekend.

To top off the plans is our application to the Future Farmers Program that should be able to assist us to become full fledged farmers. We are currently working on a rough business plan. To this point we have been working off our lists and personal drive but the time has come to get official and narrow down a 5 year plan to get us to our goals.


From all of this we can tell you it is never too late to make your life into what you dream of. From a couple of “almost old timers”, make a plan, be flexible and look for your local resources. If at first your plan doesn’t work, take a break and look at it with fresh eyes and enthusiasm and try again.

What else are you doing but living your life?


Red Onion Powder


In an endeavor to create all of our own spices from what we grow, we need to step back and look at what we use and love. Onion powder is high on the list of frequently used items. As it turns out, it is a very simple process to make and the results will blow your mind. The flavor intensity is out of this world. I use this in our absolutely favorite recipes…Red Onion Powder.

It starts with approximately 2 pounds of organic (or chemical free home grown) red onions peeled and finely minced (food processors are great).  Spread the eye burning mess on a parchment paper covered sheet pan and bake at 250 degrees until dry. Your house will burn with a unique essence that encourages outdoor activities. Go outside and enjoy the fresh air, plant something, weed something or just go for a short walk.

When the air has cleared and all is crispy and cool, throw in a coffee grinder and voila, red onion powder.

Really, make the time. There is nothing like it.

Savory for life!

Prepping for winter

The time has flown past us is in a whirl wind of activity as we struck items off our to do list this spring and summer. Now we look, with tired bodies, at what is ready and what still needs to be prepped in the garden and for the bees before winter sets in.

It’s been a good season.

The chicken coop is shingled, protected from the weather this year. Now the buildings match, which we appreciate.

DSC_0063 (2)

The buckwheat has fallen and is ready to be tilled in or left to frost kill and we can do it next spring…whatever.

DSC_0070 (2)

The raspberry patch as been taken down to 2 feet, weeded and mowed.

DSC_0065 (2)

The garlic bed buckwheat has been tilled under and is ready to plant this weekend. Roses love garlic so we are planting some behind the rose arches in hopes it helps with aphids.

DSC_0073 (2)

The saffron crocus are in bloom and need to be protected and harvested daily as they bloom.

DSC_0048 (2)

The final pea planting is hooped with a tarp at the ready for frosty nights.

DSC_0061 (2)

The empty beds have been over planted with oats for cover crop.

DSC_0066 (2)

The bees have their small entrance reducers on, honey has been harvested and they will have their final inspection and winterizing this weekend. Each gets a bottom foam board and a solid plywood board under that then a sugar feed board topped with sugar. Any weak swarm captures may be combined with a stronger established hive, we’ll see at inspection if the queens are alive and thriving. We have saved full honey frames from the harvest to give back if needed, it’s better than sugar and we really don’t need all 126 lbs we stole from them.

DSC_0069 (2)

There is the last of the carrot, beets and turnip to pull and store as well. The frost helps them sweeten so we are in no hurry other than watching for overgrowth and cracking, and they are going a wee bit over board at the moment.


I think that about covers the progress and to-do for now.

Loving the cooler air, the sweet smell of fresh juniper wood (8 cord) still to be cut.  Things move slower now, more time spent wrapped in blankets in the rocking chairs on the deck, enjoying the last of the quiet evenings while we can. Some how the time is more precious knowing the snow will blow soon.


Saffron

The time is finally here for the saffron crocus to bloom. It is dormant most of the year and has a very short bloom, so timing is everything. We have been protecting the plants from the frost with straw and a tarp. Not to mention the wire cage they were planted in to keep our rodent gardening partners out. So far, so good.

There are still 16 or so to come into bloom with three little stamen each. A bit excited to have grown saffron in Eastern Canada. Who knew it could be done? Now to decide what to do with it! Proverbial horse before the cart, but it intrigued me so we tried it.

The “grow it bug” is stronger than the desire to consume at times. Some people climb mountains…we grow things. To each their own.

Beware the first seed you plant, it may cause irrevocable addiction that will have you going to work with dirt under your nails and seed suppliers knowing you on a first name basis. It can happen to your sister, your brother, your friends…help them…give them seeds.


Garden Tour 2017

We held a little talk at our work place to explain what it is we do; grow our own food. People were genuinely interested in what and why we were doing this. From that came many requests to visit our yard and see what we do. We decided we might as well sign up for the Summerside and Area Garden Tour for the year and have everyone come on one day when we were clean and ready. So we did.

Here are some pictures. We had a good day, we answered many questions and also learned so much from our guests. So many great hints and tips shared that we are looking into(Lady bugs are already here).

DSC_0216 (2)
The yard 2017 summer
DSC_0205 (2)
The arches and garlic.
DSC_0232
7 new potato beds this year…not liking the beetles in the front of the yard.
DSC_0208 (2)
View from the greenhouse to the garage deck and down the archway.
DSC_0226 (2)
The perfect place to sit to view the back yard GH and gardens.
DSC_0263
View from the side deck(BBQ and Smoking kingdom) of the bee garden. It grows yearly.
DSC_0247 (2)
Tiffany Rose
DSC_0231 (2)
Bees and their garden
DSC_0225 (2)
3 rows Raspberry, one Black current and one Rhubarb with a white clover ground over.
DSC_0100
Hella climbing rose, sweetly fragrant.
DSC_0104 (2)
Hummingbird feeder on old door

DSC_0093

DSC_0099
Don Juan climbing rose


CSC_0215
The only annuals I can get to grow.
DSC_0191 (2)
The rose arches to the green house.

Giving ourselves the deadline of a showing moved many projects to completion that would have taken us years at a leisurely pace. There are of course new projects that came into being because of the ones we finished and we will work on those as we feel like it. The pressure is off.

Gardening is a way of life, never completed but built upon.

Enjoy growing.


Good bugs vs Bad bugs

So,I cannot say enough about the importance of talking with random strangers who love to do what you do. Some of the best advice is hidden in those moments.

We had our garden tour (pics later when we recover) and although our roses are clear of aphids, our potatoes this year are over run with potato beetle.  It seemed as though as soon as it was commented that we didn’t have aphids, they appeared the next day. Do aphids travel with people?

As it happens, a guest at the tour commented that she ordered lady bugs from Costco to combat her “bad bug”problems. I took it in stride, thinking I heard wrong or she said the wrong name of  the garden supplier she bought from. Our thoughts on bulk consumerism are not the kindest and isn’t Costco the place you buy 1000 precooked coconut shrimp in the freezer department and can also pick up a big screen TV, and maybe some nice 20 pack underwear for everyone your love?

I told the hubby anyway and he looked it up on line.  Sure enough, you can buy lady bugs by 1000 per bag, shipped right to you! So we now are in possession of 2000 lady bugs to be released tonight. And I might just not dislike Costco so much, OK I still don’t like the bulk processed food shopping zombies, but on this they get a pass. Kudos on the lady bugs!

They come in a bag with what looks like sprouts for them to feed on and the instructions are to keep them in a refrigerated so they stay dormant. They are to be released in batches over a one week period in the evenings, with leaf/plant coverage to protect them. The will breed and lay eggs that will continue to feed, for 3-4 weeks, on all the eggs and larvae you do not want. They do not eat your plants.

We are very excited to see if this works. We have tried diatomaceous earth with little success for the beetle. It does works great on slugs though.

So here goes the first release. Grow and eat and breed you little beauties.

I can only imagine the for the small cost for 1000 lady bugs they would make a nice back yard addition to anyone with kids. To walk around your back yard for 3-4 weeks and see so many lady bugs around would be thrilling for a little one. That of course is not to mention that every garden(veg or flower) could benefit from a few good bugs.

Go buy yourself some lady bugs! Who knew?

A Picture-less Post, tired…

So, spring is turning to summer and finally we have some heat to plant the gardens in. We thought it might never happen. We took 3 days off work plus the upcoming weekend to getter’ done. Days one and two are behind us and we are exhausted. There is no other way to put it.

The potatoes were planted 3 weeks ago and ,with some loving watering, are breaking through the straw covering. The peas and snow peas went in about the same time and have stayed alive, I ask for no more at this time.

The coop needed some repairs, the compost piles needed to be turned/moved, the picket fence needed some more painting(it’s almost done, just some rhubarb to move to access the rest) and we have busily been digging up strawberry, rhubarb and raspberry to give away to happy recipients as we had far too much.

We have planted all of the seeds and by the end of the weekend will plant the starts from the greenhouse as they are hardening off.

We are gluttons for punishment and just couldn’t resist the add on a local selling site that listed “fire grass” for sale, I mean it sounds so cool. Then they had other plants too so our collective OCD took over and ,40 plants later, we have them planted today. We (and I use this phrase loosely) may also have dug up 17 other plants ,we got them last year at end of season sales and were thrown in an open garden bed, and potted them to be moved…just maybe.

That and mowing the grass finally (we waited until June so the bees would have the dandelions and/or to save us work…it’s all good) which included quite a bit of raking. Not bad though as it all goes in the compost rows.

With a well needed rain storm, we rest. It’s time for rhubarb pie, some baked BBQ ribs, garlic mashed potatoes and the couch. I it weren’t for rain and full time jobs we might never rest. Yes, going to work on Monday is viewed as a rest as neither of us are required to dig holes at work.

The pie is calling. Enjoy your weekend.

Spring and rebirth, it is upon us.

So, it’s spring and we are full of new plans and excitement.

The 10 arches are ready for the climbing roses to be planted. It took 2 years to get them but they are at our supplier waiting for us and will get them shortly. It is to be a deep red and fragrant Don Juan and a white fragrant Hella. Finding roses with deep scent has been a hunt. If it doesn’t smell like a rose, why plant it? It might just be me?

The old chimney brick is piled against the house for the continuing walkway from the greenhouse, the arch walk is going to be grass at this point.

One last row of picket fence to go from the last arch to the greenhouse edge(with another arch to the side into the new shade garden of course!) is yet to be done.

The house and greenhouse seedlings are doing well and will go in the ground soon.

There are 7 new raised beds going in so we stop rotto tilling our potato beds, a cutting garden(or medicinal, yet to decide) going in the green house picketed fence area as the raspberry patch moves to the newly cleared back corner. We cleared all non-orchard trees from the little unused corner last year in prep for this.  Plus adding some lovely black current bushes and a Tay Berry bush from friends.

There is, as mentioned,  a shade garden of local natural plants going in between the green house and the fence line. A quick trip to MacPhail Woods Nursery and we are in business. We have to pick up our order for Ostrich fern, Witch hazel, Bayberry, Swamp Milkweed, Dutchmans Breeches (again, can’t giggle enough at growing pants!), and Hairy Sweet Cicily. There will surely be more selected when we get there as we have no control over our plant procurement habit.

The tandem loads of new soil have started arriving(local seaweed laced at that) and the local child labour has been contacted for wood stacking.

We have signed up to be a  garden tour location for July 16th and are in full force to pull  it together. Nothing like setting a deadline on productivity…like we need one.

The meat chicks have been ordered and their coop is scheduled for a fix up as raccoons and rodents have had a hay day over the winter with burrowing under the slab and eating through wooden door jams and walls. We had no idea after 15+yrs with that shed that now they would become obsessed with entry???

The 3 new bee nucs are ready for pick up this weekend(as 3 died over winter and these are local created, which is new for us), the pollen patties are out as well as the new bee feeder, which they seem to love and is in full vigor. Simply drill small holes in the inner edge of a bucket, fill with sugar water , put on the lid and flip over. Perfection. Just have to take it to the greenhouse at night or the raccoon will have a sugar high.

CSC_0272

Our kitchen may be temporarily closed but we are building plans for next year, you can slow us down, throw obstacles at us but we will find a way.

It is spring and everything is possible when the sun shines on you.